My son and I have been working for about 1 day every week for the last 6 months on building one of the coolest tiny houses I’ve seen yet. The construction is not yet complete, but I thought I would give you a preview of how far we’ve gotten done in such a small amount of time. Typically we work only 4-5 hours so we’ve gotten to the level of completion in the video with only 300 man-hours of work (~125 each + 50 hours for the work party).

The first work party where a few of my close friends showed up to help put up the walls and the roof
My wife and I spent 6 months of the last 4 years traveling around and photographing the homeless in cities all over the USA for her photobook The Unwanted. This experience left me feeling like the current homeless problem in our country is a travesty. There are far more abandoned homes in the US then there are homeless people, the problem is how to get these people cheap and affordable housing.

This was the original trailer with a rated 8000lb capacity I got used on craigslist for $500, zip tied license plate costs a little extra
I had been toying with building a tiny house for a while, and finally, my irritation with my neighbors reached a breaking point and I decided I had to move back on my property farther from the road. I wanted to build a house that would easily move from place to place so if I decided I wanted to go to the back of my 45 acres it would be easy to do that. I bought a nice $500 trailer on craigslist and stripped it down to the frame and rust proofed all the rust with POR-15. I wire brushed the frame and then put on several layers of spray paint over the POR-15. If you want your house to last 50 years and the trailer is used and starting to rust you are not going to want to skip this step.
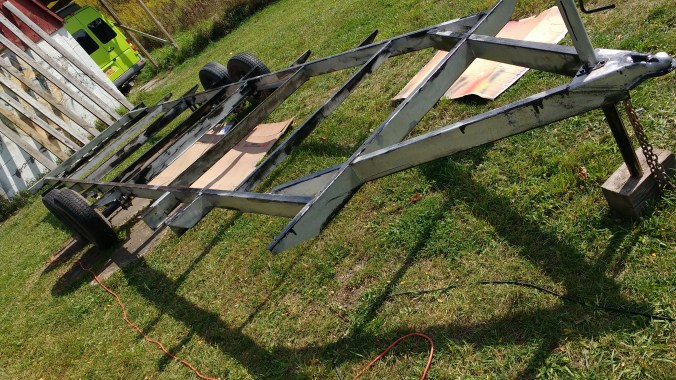
This shows the trailer getting rustproofed and painted
The trick with rustproofing is getting all the rust off and then cleaning it with the cleaner and the metal prep. I buy one of the small stop rust kits for about $20 then buy 6 packs of the POR-15 in tiny cans. Once you open a can you need to close it with a layer of saran wrap under the lid to keep the lid from freezing onto the can. Also, the cans tend to be unusable after a few weeks once they have been opened so try to do all your rustproofing at the same time. I’ve tried about 10 different ‘rust-proof’ products but POR-15 is the only one I recommend.

I put down Tyvek then built the flooring joists on top which went about 1 foot over on each side
Putting Tyvek house wrap on the bottom of the floor turned out to be a serious mistake. When I tried to cover up the floor for one winter the tarp leaked a lot of water through the floor and it ended up getting trapped in the Tyvek. I had to cut every piece of Tyvek with a mat knife to drain the water that had collected out. Wood is an amazing material unless it gets wet and it can’t dry out. When that happens you get mold and rot. I insulated the floor with 2″ of Polyiso board and then some Reflectix aluminum bubble wrap in between the large air spaces. I also ran a bunch of Pex tubing and septic lines in the floor so I didn’t have to worry about them ever freezing.

2″ Poly Iso boards bought for 1/2 price as defects from the Amish in Penn Yann with E B Martin roofing
Reflectix works far more efficiently if you have large air spaces between the layers of Reflectix. Normally it’s rated for R4 or so but if you can seal up large air spaces you can get R21 with just 2 layers of material. I have to admit I’m having a love affair with Reflectix and with Poly Iso board. Both materials produce massive amounts of R-value with very little board thickness. The trick is really to seal every layer as you go and to embed air spaces between the layers which end up becoming ‘free insulation’. For the ceiling of my tiny house I used a 2.5″ thick piece of Poly Iso board (R16) with a 3/4″ Inch airspace (R4) and then another piece of 2.5″ Poly Iso board and then another 3/4″ air space and then the interior wall. This means a total value of R40 (higher than R40 doesn’t really exist) with only 2 layers of 2.5 Poly Iso board. You can also get used Poly Iso boards on Craigslist from people who buy them used by the 18 wheeler load usually at about 1/3 of the price of new boards. I bought factory seconds from E B Martin roofing and ended up with only one board out of 30 I couldn’t really use.
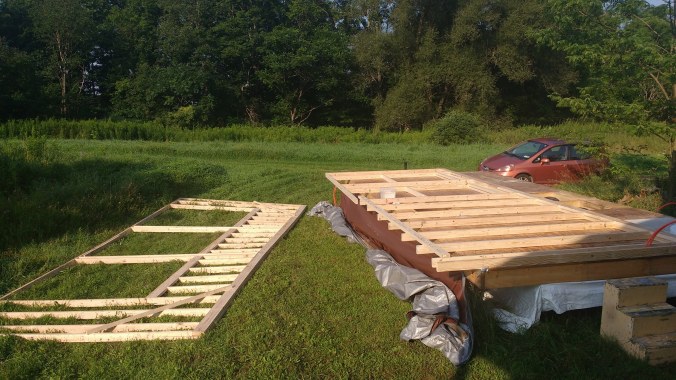
I built the walls by myself on the floor of the trailer so they were flat then dragged them off onto the ground
It took me about a day to build all the walls by myself, but it took 4 people to safely erect the walls on the S and N walls. The headers were built out of doubled up 2×6’s and that made them heavy and awkward to handle. When building your own tiny house expect to have a work party to erect the walls and ceiling and find out who your real friends are. In one day with about 6 people we got all the walls up, the doors and windows in and the roof on. We got the first layer of poly iso up on the outside walls. For this house I used 1″ Poly iso on the outside of the framing (R7.5) and then 2″ Poly Iso crammed in the middle of the 2×4 boards with a hammer with 3/4″ air spaces on either side. It’s great running the Pex tubing for the water and the Romex for the electrical in between the layers of Poly Iso board.

Here you can see how the floor was built around the wheels to allow the ceiling to be several inches higher than normal.
On the East wall, I ran 2″ Poly Iso board on the outside and 1″ board in the wall because I needed extra room for the 100 Amp breaker box and all the wiring and plumbing for the bathroom.
One of my pet peeves is tiny houses where the kitchen is mounted in line with trailer. This ends up making the tiny home incredibly narrow which feels totally cramped. I wanted my tiny home to feel open and spacious so I put the kitchen where it belongs, at one end of the trailer. I decided that the shower and the toilet would be at the other because, well you want to keep your crapper as far as possible from the kitchen. I have a line on a composting toilet which I may or may not use, I haven’t decided yet.
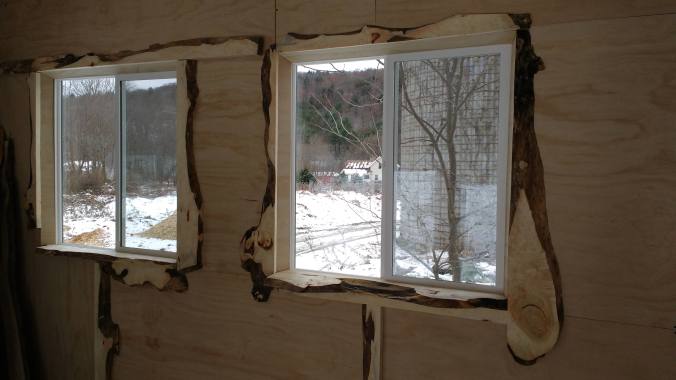
The North facing windows are inexpensive 4’x4′ sliders
When it comes to the dimensions of the tiny house I opted for 11′ wide because I wanted the house to feel big and 24′ long because that was the length of the trailer. You don’t ever want to build anything over 13′ 6″ tall because it won’t be safe to drive it on the road. Even at 11′ if I wanted to move this tiny house on the road I would need to have an oversized load permit. Since I don’t plan on moving it, or if I did it would be nearby that was not a consideration.

The West facing kitchen window trim is made of planed cedar
I managed to get a bunch of cut off scraps from a local lumber yard for $2 a board. I ended up planing a bunch of them which ended up getting prettier and prettier every time they ran through the planer. The black walnut is my favorite, but you need to wear a respirator when working with and planing black walnut because the dust is very bad for you. To build the walls I put up large sheets of cheap plywood which was about $20 a sheet and then covered up the seams with wood trim. When putting up the plywood it’s critical that you use a high-performance construction adhesive on the studs as the plywood ends up becoming one of the primary structural components of the house. When it is going on the road and bouncing up and down, these large sheets of plywood are what keeping the house from flopping around.

The first roof did not include the overhang which was a mistake
When I bought the first set of roofing it was not long enough to cover the 4′ overhang. That ended up being a huge oversight and I bought longer roof panels and then took the old roof and reinstalled it again. When doing low pitch metal roofs like I did, you must put a bead of Butyl tape on the top of the ridges that connect the panels. Make sure you buy metal roofing that is designed for low slopes, and I opted to get the heavier commercial strength panels. They were much heavier, but I don’t want the roof to ever leak. The Amish at E B Martin sold me tiny 1/4″ Butyl tape, but I decided to get much thicker 1″ Butyl tape from Amazon for the 2nd roof install. I want this house to last for 50 years or more and to be able to support a 4′ snow load without any issues.

Friends help you build houses, real friends help you build dreams
It helps a lot if you can have a roof without any penetrations, many things like septic vents and the like can be vented out of the walls instead. With a 12:1 roof pitch like I had, you are asking for trouble with any roof protrusions.
If you buy a couple thousand dollars worth of stuff at the same time you can get a 5% discount at the Lowes Pros desk. You can usually weasel free delivery out of them too, although sometimes that is a hassle. I try to buy at least $3000 worth of stuff at a time and then have it all delivered.
With my tiny house, I opted to store all of my ‘stuff’ in shelves that were high up around the walls on the inside. Ikea sells cloth boxes for a couple of bucks that are the perfect design for keeping your stuff stored away in. I can drag a chair around the house and easily stand on a chair and pull cloth boxes of my stuff down for access.

Originally I spent many hours tweaking the design on SketchUp before I settled on a single story
Building a tiny house is not only fun, it’s also cathartic. I know that I’m building a home that will take almost no energy to heat, will stay cool in the summer and will be a beautiful place to live to boot. The wood trim I’m using was throwaways from a mill and the Poly Iso board is seconds that would have probably ended up in the landfill (along with the beat-up $500 trailer).
I think about my fondest memories with my father and it was when we were working on my first house together. Now I can have the same experiences with my son and the cycle begins anew. For less than $10,000 and hopefully in less than 1 year (or 500 man hours) I’ll end up with a beautiful home that will keep me warm, safe and dry for years to come. You don’t need to throw down hundreds of thousands of dollars on a home and then be saddled with tax debt until you die.
Just get tiny.

Pingback: I’ve got the power: Using the Cybertruck to power my off-grid Tiny House | ELECTRICBIKE.COM
Pingback: How to run your off-grid Tiny House with an Ebike battery | ELECTRICBIKE.COM